
Censoring at UiT
On these pages you can find information and user guides for marking in Wiseflow.
If you can't find what you are looking for on these pages, contact us at exams@uit.no
Click here to learn how to use the marking tool
Summary
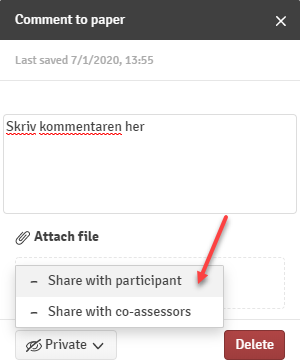
You can read and comment on the submitted answers in Wiseflow. You can write comments to either all the students who took the examination or to an individual student. You write comments either as comments/annotations in the answer and/or as a summary at the end which may be shared with the student as an explanation and/or with the other examiner(s) (referred to as co-assessor(s) in Wiseflow). As a starting point, all the comments you write are private and you must choose to share a comment with the co-assessor or student, or both. The comment will be visible to the co-assessors under Summary immediately and to the student when the assessment period has ended and the grades have been finalised.
- All information about grade justification can be found here [link]
- Marking a written exam
- You can also download and print the exam papers, here is how to
- video tutorial for registering grades in Wiseflow (in norwegian only) (Link missing, new content needed)
- More about registering grades [insert link)
The examination question paper can be a bit tricky to find in WISEflow. Please se the screenshots beneath.
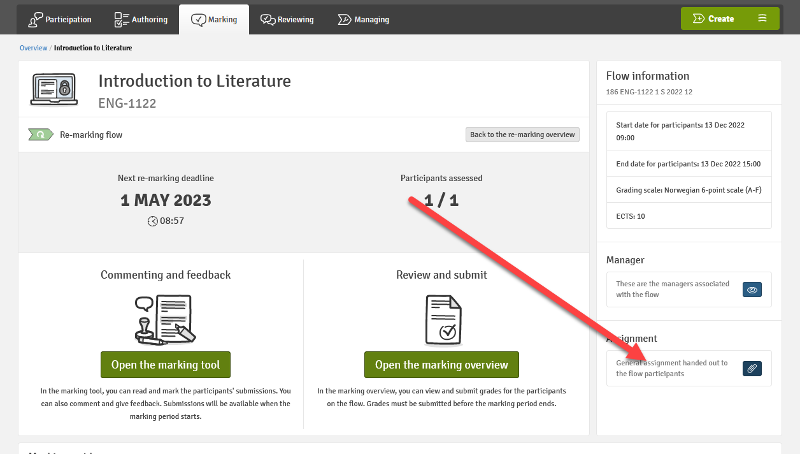
From within the marking tool:

Multiple-choice tests in Wiseflow (Flowmulti) can be based on auto validated (i.e. self-correcting) questions, or a combination of such answers and answers that must be assessed by an examiner. If you are going to assess answers that are fully or partially auto validated, use Flow Statistics to view statistics and the mark calculator to set grades. All examiners (markers) must convert points into a grade equally.
Read here how to convert points into a grade. See Adding and Using the Grade Scaler.
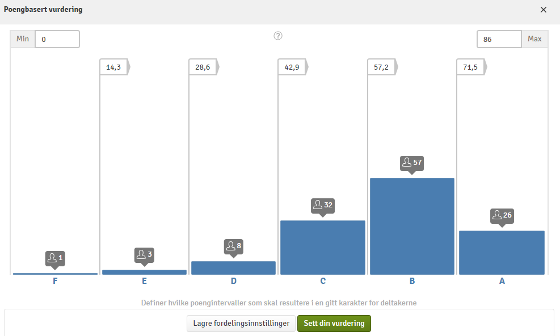
Learn about using the statistics here.

Adjust for errors in the examination question paper during assessment
The functionality does not yet exist to adjust for any errors in the examination question paper. Consequently, if you need to annul a Section during an ordinary points-based assessment, you need to do this manually. This can be achieved by giving all the students the full score for the question and then later adjusting the grade conversion.
In rare occasions the marker realise that the validation or scoring on a given question is wrong.This can be adjusted by the author of the assignment.
Administrator in the flow must be contacted to see to that the change is being effected for the relevant exam.
In Wiseflow it is possible to download an Excel spreadsheet to use for offline assessment and calculate the final grades. When you are finished grading, upload the updated Excel spreadsheet so the grades can be distributed to the correct candidate. Click here for instructions.
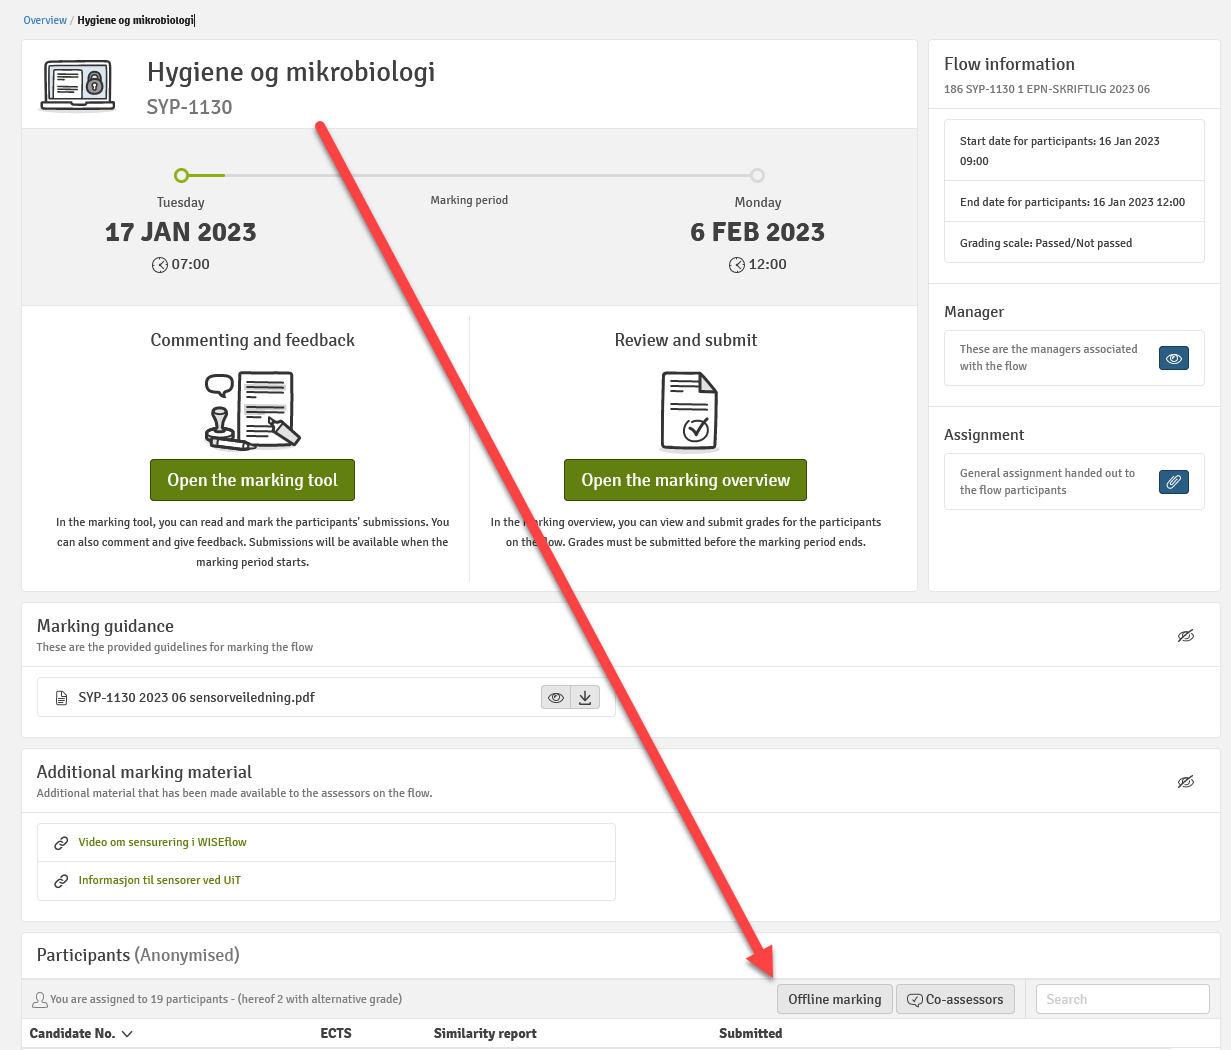
Link to user guide for item-based marking.
Summary:
When you are only marking some of the items (one item = one page) of an examination answer, you approve the correct score per candidate, either alone or together with the co-assessor(s). One person in the committee must be granted a reviewer access, and will make sure the points are converted into grades, based on the agreed scale.
Mark parts of the examination answer in Wiseflow (video)
1. To minimize the number of clicks required, it is a good idea to check all the points and write all your comments before finally approving all Sections per candidate by clicking as shown below. Click on the candidate field in the top right-hand corner, click on the menu symbol (hamburger icon) and select Approve.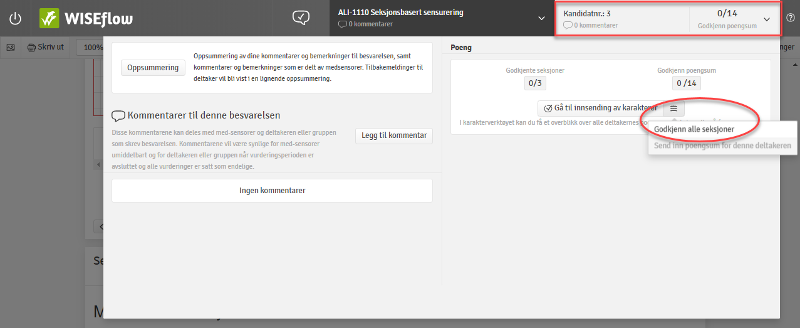
2. After approving all point for all candidates, open the marking overview to finalize your part of the makring.
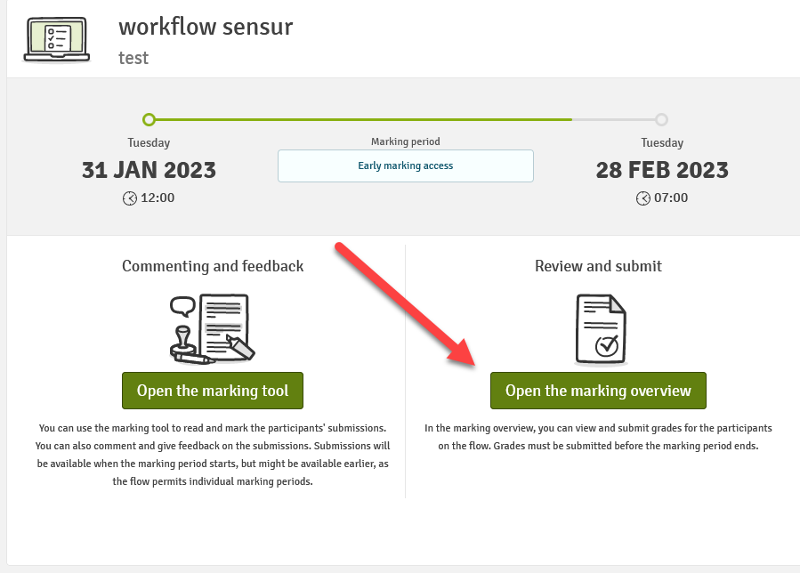
3.Submit all.
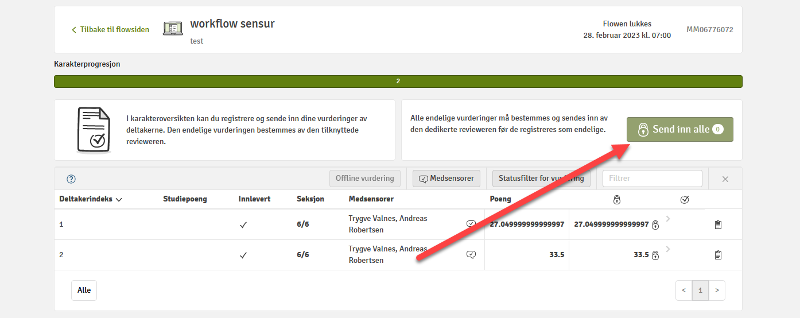
4. One or several of the markers is also a reviewer. Reviewer makes sure that the grade scaler is set up accordingly and submits the grades.
5. Reviewer submit the final grades after converting point to grades via the the Grade scaler. See image below.
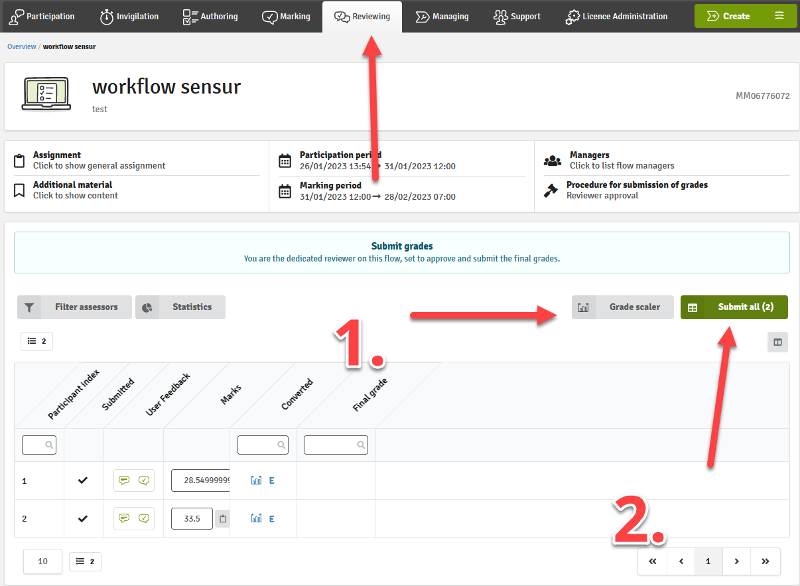
Note: It is not possible to give justification for grade via WISEflow with this setup. The justification must be either shared as a comment from one of the assessors, via email or orally.
This section providers guidance to examiners (referred to as assessors in Wiseflow) about examining video material.
As an examiner, go to uit.wiseflow.dk and open the relevant examination. Click here for more information about how to log in.

Click on Open assessor tool or on the green speech-bubble icon of the relevant candidate whose file you wish to watch.
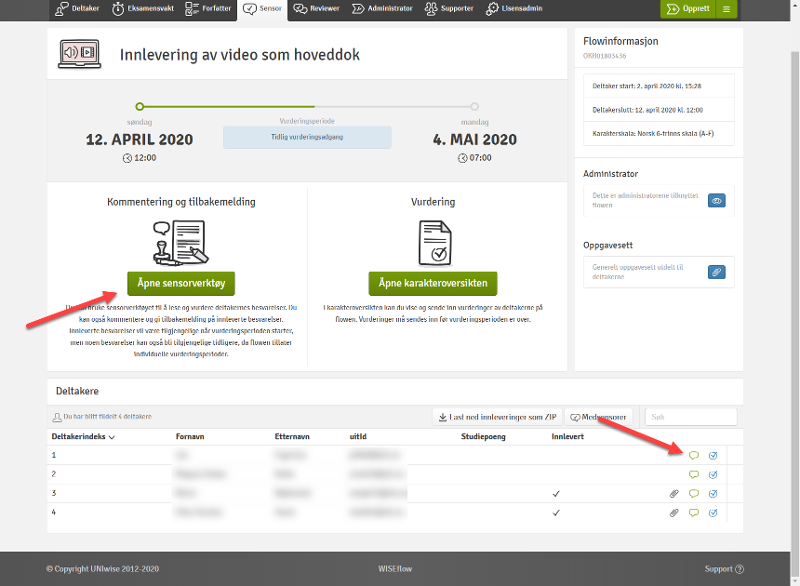
(It is desirable that examiners watch videos directly in Wiseflow. This way, you avoid downloading and storing personal data. To watch a video, click on the eye symbol (green arrow).

Playback will vary from browser to browser, but the MP4 file format is supported by most browsers and, as such, can be viewed directly in Wiseflow.
- We recommend Chrome for both Windows PCs and Macs.
We ask the students to submit their files in MP4 format, so examiners avoid needing to download the files onto their computers.
If you have received a file that you cannot view by clicking on the eye symbol, you need to download the file onto your computer and watch it on a media player installed on your computer (yellow arrow).
- The files will initially appear in the “Downloads” (“Nedlastinger”) folder.
- Create a folder to store the downloads in, so you have complete control of the files you are downloading onto your computer.
- Download the file.
- Delete the files when you have finished.
It is important that you delete the video files that you have downloaded onto your computer as soon as you have finished watching the file. Remember you can download the file again from Wiseflow if you need to watch it again later.
If you have received a file that lacks sound or video (or both): The student may have used a codec that cannot be decoded in a standard Windows or iOS media player. In this case, download VLC Media Player and try to play the file on VLC.
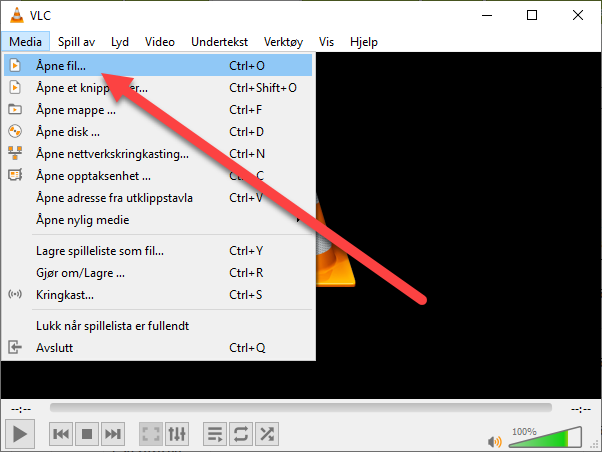
UiT employees can access VLC in the Software Centre, or you can download free by clicking here. If you can see or hear a file in your browser, save the file in a local folder on your computer (initially under Downloads/Nedlastinger). To play a file, open VLC, open the Media menu and select Open file:
You will find more information here about examining in Wiseflow, including how to register grades. [link]
These instructions are designed to show you how to register the final grades in Wiseflow, e.g. if you have printed the answer papers and done your assessment on paper, or if it is a written paper-based examination and the grades shall be registered digitally. Please note that you can also enter grades in the Assessor tool and go directly to the submission of grades from there.
The registration process:
1. Follow the link you got from Wiseflow and log in using your UiT username and password. Alternatively, visit uit.wiseflow.dk, log in using your UiT username and password, and select the correct examination under the “Assessor” tab.
2. Click on Open the mark overview
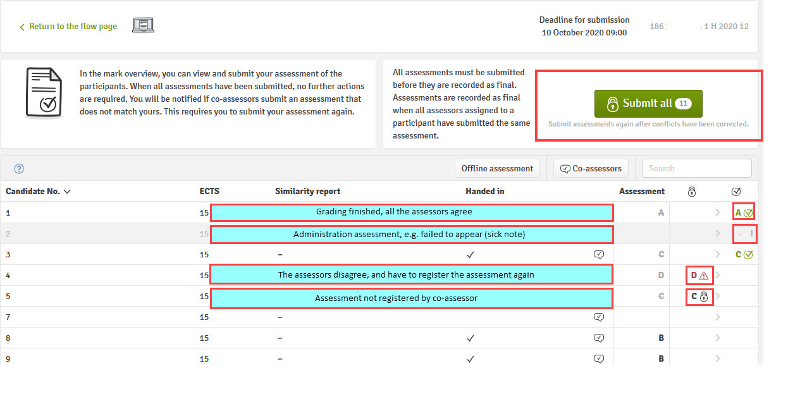
3. Each examiner (assessor) registers their grades in the “Assessment” column. Submit the grades individually or click Submit all when you have finished.
4. If you have submitted your grades, but the other examiner (co-assessor) has not registered his/her grades, this will be indicated by a padlock next to the assessment you have registered.
5. When all the examiners have submitted their grades, the grades will then be sent to the administration. If the examiners have submitted the same grade, this will be indicated by a green tick in the right-hand column.
6. If you have registered different grades, this will be indicated by a red warning sign in the same row as the grade. You must then talk with each other and submit the correct grade, as it will not be accepted unless you register identical assessments.
7. If you discover that you have registered the wrong grade before the grade has been finalized, you may withdraw the grade. See "Withdraw grade" on this site.
Other relevant information
If a candidate submits a blank answer paper, he/she should not be awarded a grade, cf. Section 24 of the Examination regulations at UiT. (Link in Norwegian) This also applies to “a paper which clearly does not constitute an academic attempt”. Please contact the administration if you discover this among “your” candidates.
The administration processes the registration of other result statuses, e.g. failure to attend the examination, withdrawal from the examination or medical certificates. This means that the administration shall also process postponement of home examinations.
The assessor tool in Wiseflow is designed to best assess in front of the screen and online. If you still need to print out the answers, or download them to the computer, this is done as follows:
Link to procedure for downloading answers and assessing offline.
IMPORTANT: If you have downloaded answer papers to your computer, they must be deleted when the work with assessing is finished.
- As a deafult setting the comments and annotations in WISEflow are private and visible for you only. To share a comment og annotation you must share with co-assessors or participants (students).
- The default setting can be changed on the flow by the manager/administrator. Ask the administrator on flow or eksamen@uit.no if you want the default setting to be shared with co-assessors or both co-assessors and students. In this case you must actively "unshare" the comment/annotation if you do not want to share it.
- Comments/annotations are immediately shared with co-assesor, and shared with students after the marking period has ended.
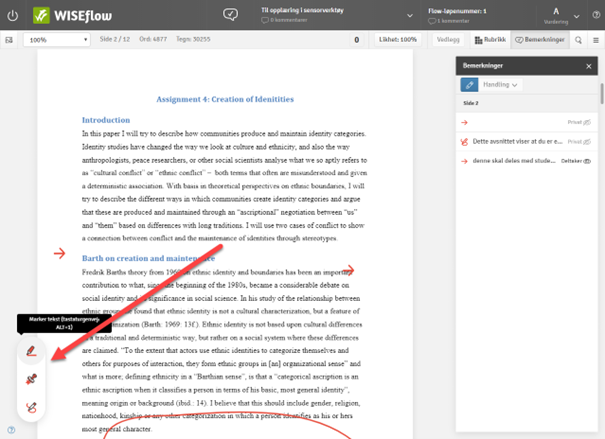
Select the marker tool to add comments in the answer paper:
This is where you enter your final comments that can be shared with the student and co-assessor as an explanation for the grade:
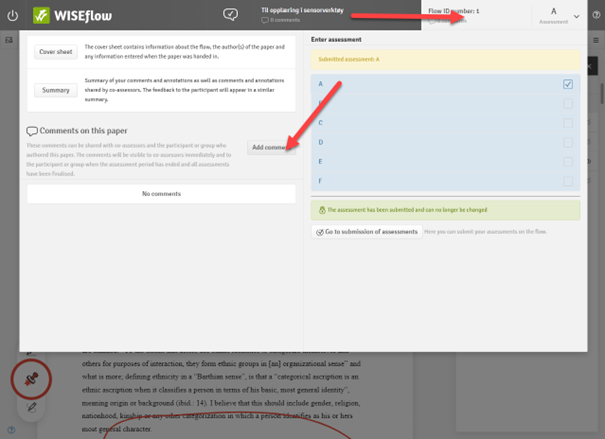
To enter a final comment to the student (e.g. as an explanation), click in the candidate field in the top right-hand corner and then click on Add comment. This is where you enter your final comment and share it with the student and/or co-assessor:
Thank you for accepting the task as an examiner for UiT The Arctic University of Norway. This guide is for helping you log on to our examination system.
Make sure that you have all the accesses you need all in due time before you start assessing. If you experience any trouble, please eksamen@uit.no
International users without a Norwegian national identity number will receive a temporary access link in your email inbox. The password is sent to your registered mobile phone.
If you have not received such a link, please contact eksamen@uit.no
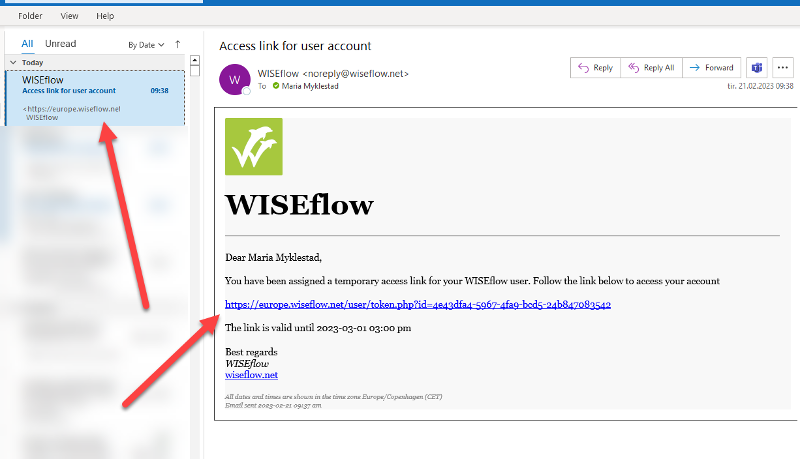
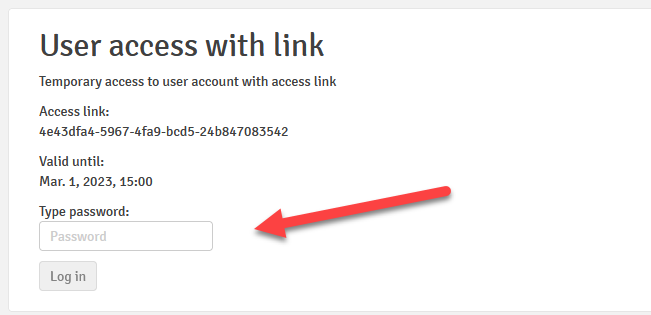
Select the link and enter the password received on your mobile phone.
You can only use ID-porten as a log in-alternative if you have a Norwegian national identity number.
- Go to uit.wiseflow.dk
- Choose

- Choose your preferred log in-alternative
- Choose the exam you want to assess
- To see the plagiarism report from Ouriginal, you have to log in with your username from UiT. Find your UiT password and username here: https://passord.uit.no/
- UiT has two-factor authentication for Feide-login, including Ouriginal.
- If you are using Ouriginal for UiT for the first time, you have to create a user account.
For international users without a Norwegian ID number, use this form to activate your UiT user account.
Please note that UiT has activated two-factor authentication. This means that all users must enable this before logging on via Feide. Information about two-factor authentication is found here.
When assessing for UiT there will be created an IT-user account for you. You can use this account to log on to Wiseflow.
- For user name and password, go to uit.passord.no
- Use Chrome or Mozilla Firefox, with incognito tab (Chrome: Ctrl+Shift+N) or private tab (Firefox: Ctrl+Shift+P)
- Go to uit.wiseflow.dk
- Choose Log in
- Choose Feide
- Choose UiT The Arctic University of Norway
- Enter your UiT user name (format: abc123 or abc1234) and password
- Follow the instructions further
- Grade justification can be given in Wiseflow without the student first requesting it: when writing a "comment to submission", tick the box "Grade justification". The justification will become available for the student when they've received their grade for the exam.
- Students may request a justification for grade via Studentweb. Assessors will receive the request in Wiseflow and answer it from there.
- The deadline for students to request a justification is one week after they've received their grade.
- You will receive an email from Wiseflow titled "New tasks in Wiseflow - request for..." notifying you of new justification requests. Follow the link in the e-mail to get to an overview of the justification requests in Wiseflow.
The justification should explain the general principles underlying the assessment, as well as explaining how the specific grading decision for the specific candidate's work was made. (Eksamensforskriften § 43)
In line with this, the student should be informed about:
- The general principles the assessors have based their grading decision on, and
- Why the grade was given for this specific work.
Simply pointing to general guidelines for assessment or learning objectives without saying something about the candidate's exam in relation to them will not suffice.
The general principles underlying the assessment will typically be learning objectives for the course, criteria defined in the guidelines for asessment, and the grading scale as defined in § 35.
If you are unsure if the students are informed about these documents, it would be appropriate to refer to them.
For exams where students receive an initial grade before a final grading decision is made following an oral exam, it is important that either none or all students receive a justification for the initial grade before the oral exam. This is because information about the initial grading could put students in an advantage to students without this information in front of the oral exam.
By default the internal assessor will receive the justification request from the candidate in Wiseflow. The internal assessor will be notified by email that there are requests for justification in Wiseflow that must be answered. The email contains a direct link that leads to an overview of the justification requests in Wisflow:
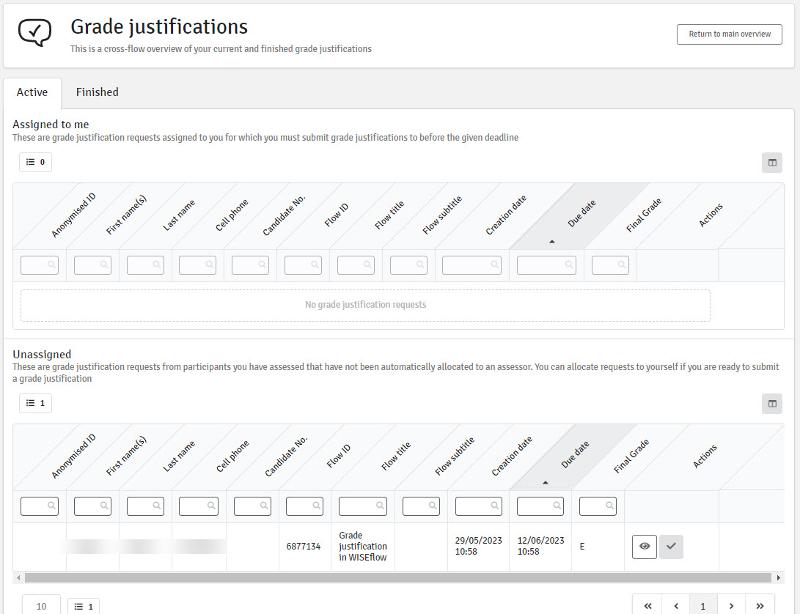
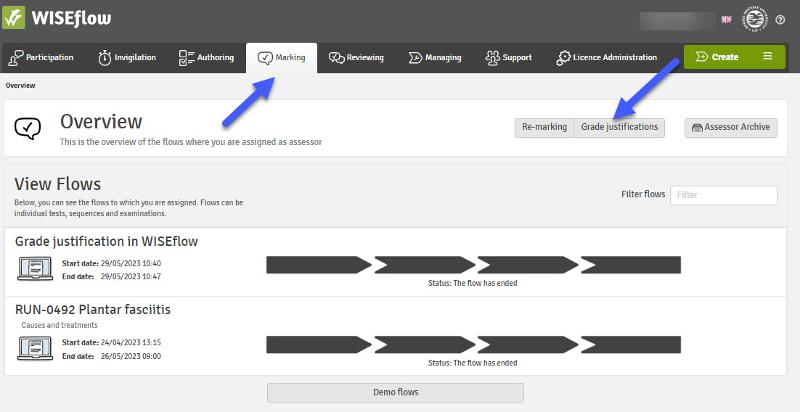
If you are not sent directly to this overview, you can navigate there from the Marking-tab by clicking the box "Grade justifications", as shown below.
If you've received justification requests that should have been assigned to another assessor, see "My co-assessor is giving the justification".
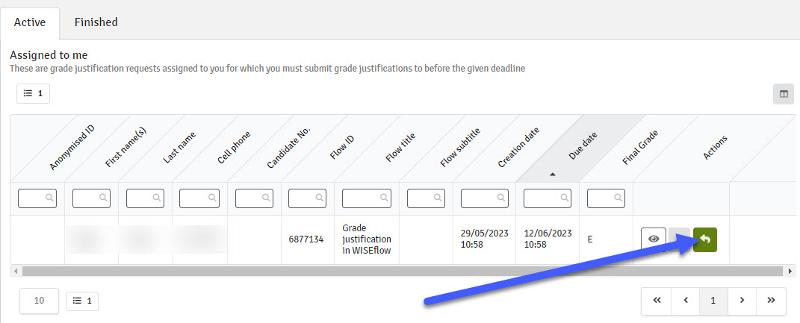
To answer a justification request, click on the "reply"-button as shown in the picture below
If there are more than one internal assessor per student, the request will not be assigned to any of you. Instead, all internal assessors will receive a notification that there are unanswered requests in Wiseflow. The assessors must then agree on who's to answer the request, and select it from the bottom "unassigned" section in the justification overview in Wiseflow.
If the request is to be answered by an external assessor, you must contact the administration to have the requests redistributed in Wiseflow.
When you click on the "Reply"-button (see picture above), you'll be taken directly to the student's submitted work in the assessor tool:
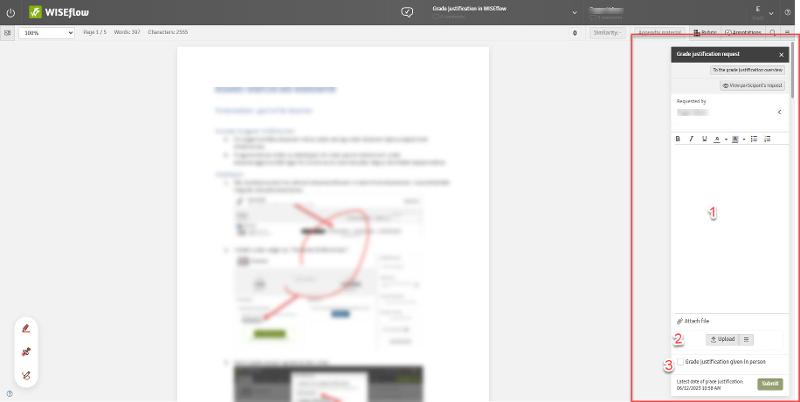
The dialogue box where you write or upload the justification will open automatically (to the right in the above picture). Here you can 1) Write your justification, or 2) upload a justification from your harddrive or cloud storage. (This could be a text-document like a PDF- or Word file, or an audio or video file.
If the request is answered verbally/in person, tick the box (3 in the picture above) to register this. You'll find the student's contact information by clikcing the little arrow in the upper corner of the dialogue box: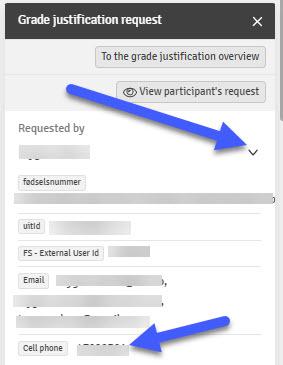
When justification is given verbally, remember to set the correct date in Wiseflow. This is important because this information determines the deadline for appealing the grade.
In the case of group exams where a group of students have submitted one collective paper; justification for the grade is shared with all students in the group.
If you wish to give justification for grades without the students first requesting it, do the following:
1. Click on the candidate box in the upper right corner in the assessor tool
2. Choose "Add comment"
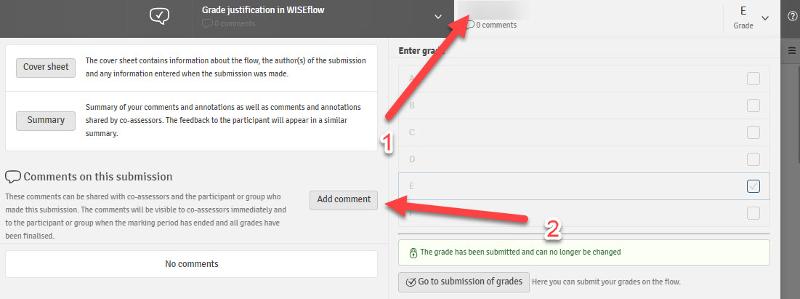
3. Write or upload the justification
4. Tick the "Grade justification" box
5. Submit the justification
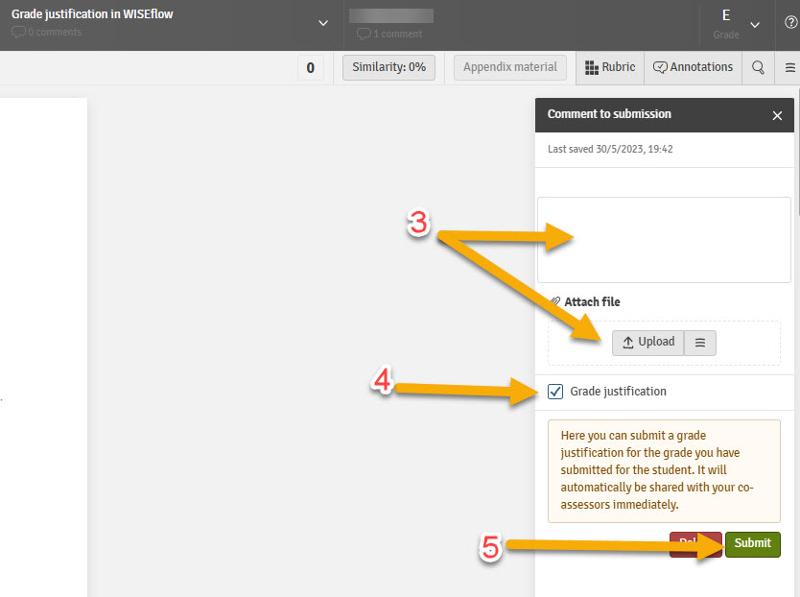
When the grade is made available for the student, they will receive an e-mail notifying them that an assessor have given a justification for the grade. The notification contains a link that will take the student directly to the justification in Wiseflow.
If you're giving grade justifications verbally/in person, and without the students first sending a formal request for justification, follow the steps below:
1. You must know which candidate number that was assigned to the person you are contacting. If you don't have this information, contact the student adviser at your department/faculty
2. Go to uit.wiseflow.dk and from the marking tab, choose your exam
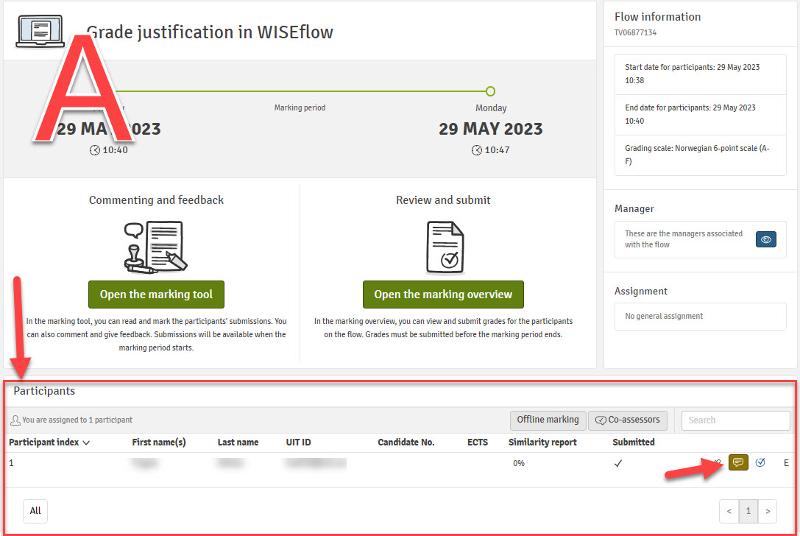
3. You can move directly to a given candidate from the overview (picture A below), or you can open the marking tool and choose between the candidates from there (picture B below).
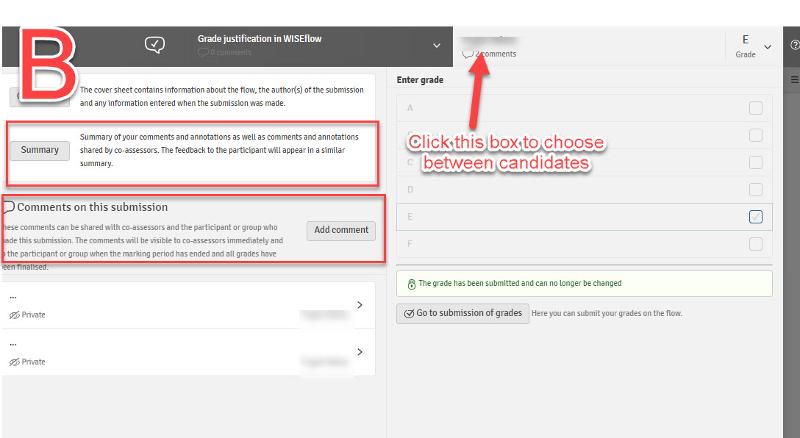
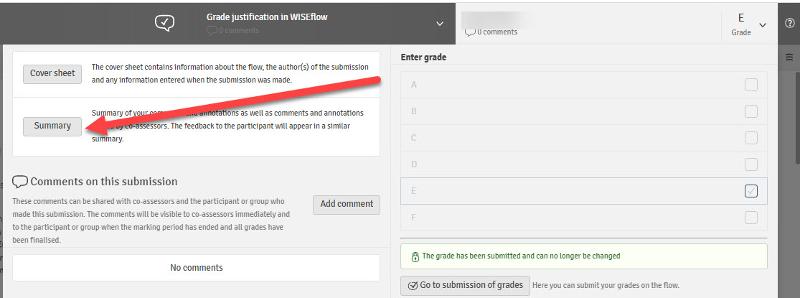
The "Summary" let's you review you own or your co-assessor's comments. When you have spoken to the student, go to "Add comment" and the following dialogue box will open:
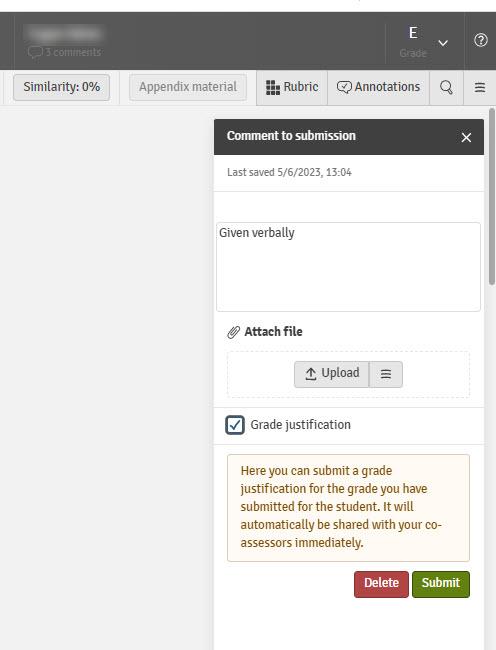
Here you can simply write "Given verbally", define the comment as "Grade justification" and submit. This must be done the same day as the justification is actually given: This is important because the date-stamp on the justification determines the deadline for appealing the grade.
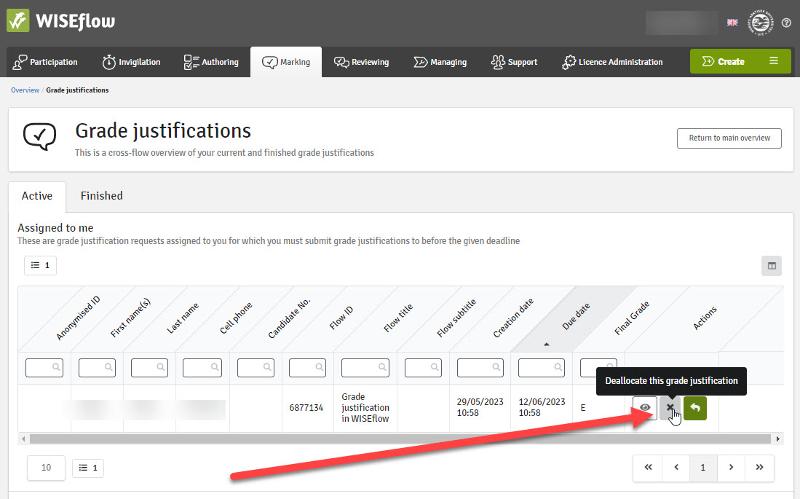
If you've received a request for justification in Wiseflow, but it is your co-assessor who is supposed to answer it; this can be taken care of between the two of you. Click on the cross-symbol as shown in the picture below to remove the assignment from your list. Your co-assessor will now find the request in their overview and can select it from there themselves.
As long as a request is not assigned to a specific assessor, all assessors will receive a notification that there are unanswered requests in their list.
To view a grade justification given by a co-assessor, go to the "Summary" as shown below:
When using rubrics, always share the rubric with the candidate, as this will provide beneficial feedback for the candidate. A well designed rubric can also serve as grade justification or at least as part of it. Rubrics can also be used when the justification is given verbally, as a means of structuring the conversation with the student.
*If you receive a request for justification outside of Wiseflow, you should refer the student to Studentweb, so that the request can be answered from Wiseflow. Alternatively, the request can be registered manually. This can only be done by the administration.
** If you receive a request on the last day of the student's deadline for requesting justification, you will not receive a notification about this request until the next day. The reason for this is that the notification email gathers all incoming requests for the last 24 hours and sends out notifications about these after that.
*** The notification email notifies you only of requests submitted the last 24 hours. If you've solved a case the same day as you received it in Wiseflow (but before the notification about this request), the system will not pick up that the request has been answered, and so you will still get a notification about this now solved request the next day. The notification emails are sent in the morning, and gathers all requests from the morning before.
Knappen må hardkodes til å sende bruker automatisk hit: https://europe.wiseflow.net/login/license/6
Oppdatert: 17.11.2022UiT The Arctic University of Norway treats plagiarism and cheating seriously. If a student is found to have committed plagiarism, in the worst-case scenario he/she risks being suspended from the institution for up to one year. Consequently, it is important that as employees we are clear about what is expected of the students right from the start.
According to the examination regulations, examples of actions which are regarded as cheating or as an attempt to cheat are:
- Using unauthorised supports during the examination
- Presenting the work of other people as one’s own work (plagiarism)
- Citing sources or in other ways using sources in one’s written work without referencing those sources properly
- Submitting an examination answer which has previously been submitted as an examination answer at the UiT The Arctic University of Norway or any other institution of higher education
- Engaging in unauthorized communication with other students during the examination
- Acting in conflict with the examination regulations or in any other unlawful way which may give one advantages during the examination
Every examination answer submitted at UiT shall be an independent piece of work associated with the course in question. If a student uses part of their own examination answer which has previously been submitted, the student must cite himself/herself to avoid committing plagiarism in accordance with point 4 of the list above.
If you suspect plagiarism in one of the answer papers, you must state the grounds for your suspicion and notify the person with administrative responsibility. The administration follows this up and prepares any case against the student.
As an examiner, you should not decide whether the candidate has cheated, but rather assess the answer paper in accordance with normal academic criteria, such as a lack of independence or breach of the current norms for referencing and academic integrity. The examination result will be published as normal. However, if the student is found guilty of cheating, the grade will be annulled.
The Quality Assurance System for Educational Activities (link) (only in Norwegian) deals with the administration of cases involving cheating.
Read about the text recognition system Ouriginal here (link)
The first time you log in:
If you do not have a UiT Ouriginal account, please follow these instructions to create one:
- Go to https://secure.urkund.com/account/auth/login
- Select Single sign-on Login
- Select UiT the Arctic University of Norway
- Log in using your UiT username and password
- Follow the instructions to create an account
- You may also contact eksamen@uit.no to assist you in creating a user
Where do you find the reports of the answer papers submitted in Wiseflow?
All answer papers submitted in the examination system undergo a plagiarism check via Ouriginal. A percentage score in the list of candidates shows whether the tool has detected especially high similarity with another text. You can click on the similarity report score (percentage) to view the analysis, here:

Or in the Assessor tool, here:

Log in
You need to log in to continue:
1. Note - Ouriginal does not work in Internet Explorer
2. Click on the link to the text similarity report in Wiseflow. Click on the similarity report score (percentage) in the list of candidates or in the Assessor tool.
3. The log-in page to Ouriginal will then appear. Click on the drop-down menu, select “UiT The Arctic University of Norway” and then click Proceed
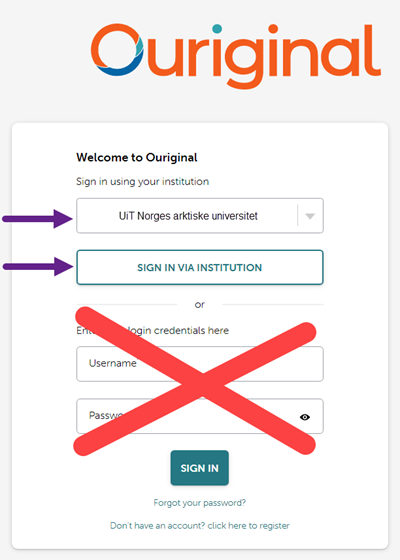
4. Log in using your UiT username and password
You can also upload an answer paper or a thesis manually, outside of Wiseflow or Canvas. Log in via www.urkund.com [link]
What does Ouriginal do?
Ouriginal analyses submissions that come from UiT via
a. Examination submissions in Wiseflow
b. Submissions in Canvas when the plagiarism checker is selected/turned on
c. Manual submissions that are uploaded on urkund.com
These are saved in UiT’s database at Ouriginal. During a text similarity analysis on an answer paper submitted at UiT, Ouriginal searches for similarity with other documents by searching among sources in UiT’s database and open sources on the internet, as well as many academic databases and journals.
Please note that the analysis from Ouriginal only states the percentage of paper that the system can recognize from other documents. A high percentage does not necessarily mean that the paper includes plagiarism but indicates that the text may be found elsewhere.
A high percentage score may be a sign of shortcomings with independence or, in the worst-case scenario, plagiarism. Use the report critically and make a professional assessment of whether grounds may exist to suspect plagiarism.
Some common questions:
- The answer paper includes plagiarism. What do I do?
- The report includes sources, reference lists and citations: You can use the report actively by deactivating findings that you can see are clearly not plagiarism. There is a link to the user guide above. You can safely deactivate any reference lists or quotes that are cited correctly.
You see that some of the paper is copied from another text but Urkund has not marked this as a finding
- Ouriginal does not detect everything. Always treat the report critically and use your own competence. The report should serve as an indication.
Online course in deterring student plagiarism (by RESULT) (Norwegian course)
The purpose of the course is to encourage more focus on educational methods to guide students away from plagiarism. Academic writing and referencing techniques, increased attention to learning processes, and the design of assignments and exams are all examples of important areas in this connection.
The University Academic Services at UiT recommend using the video communication tool Teams for oral examinations. Some academic departments may have chosen other tools for holding digital oral examinations. As an examiner, you must check with the relevant institute or faculty for further information.
This page outlines what the examiner must do to be ready for digital oral examinations via Zoom. You will find general user instructions from UiT here.
- We would like to emphasize the importance of testing your connection before the meeting
- For support during testing and setting up, please contact the Orakel service IT support. All the examiners must test their connection using their UiT account.
- The information on these pages must be shared with all examiners well in advance of the examination.
- You should receive an examination schedule and meeting link from the student advisor or person with academic responsibility well in advance
- The grades must be registered in Wiseflow, so it is important that you have access to this well in advance of the examination day.
- Installation of the Teams - app in advance of the exam is recommended. TEAMS app
UiT employees:
- To activate your account: Go to https://office.com
- Log in to with your UiT-user abc123@uit.no
- Type in your UiT-password if requested. Click Sign in
External examiner:
- As an examiner at UiT, you normally participates with your UiT-useraccount or from a link recieved by email.
- As an examiner, remember to identify by your full name in meetings.
If the external examiner is prevented from using UiT ID/account:
- See this guide to participate without a Microsoft Teams account
- We recommend installing the Teams app on your computer, but participation is olso possible via smartphone or browser.
- Recommended browsers are: Microsoft Edge og Google Chrome. (Safari for Mac does not work).
- A link witch summons you to the meeting should have been sent to you by email.
- Remember to identify by your full name.
- When entering the meeting a host will have to let you in.
If only external cencors without UiT-ID/acount is in the exam commission:
- Use individual links fore each student
- The scheduled meeting has to be open to everyone
- All censors must remember to identify by their full name.
2. Testing your equipment:
When the Teams app is installed it is impotant to test your equipment.
- Click on this link to test your camera and microphone in Teams: Test
- You might have recieved a link for testing. Use it.
- Please contact the Orakel service on +47 776 44 544 or by e-mail at orakel@uit.no if you experience any problems during your preparations and testing.
Tips for successful meetings (video in Norwegian):
- Use a good microphone and preferably a headset to ensure good sound quality
- Ensure you have a stable internet connection
- Sit in a separate room to avoid disturbances during the digital meeting
- Check your background in the video – attempt to have a clean/neutral background
- Check your lighting to ensure you can be seen clearly and there is no light coming from behind (e.g. natural light through a window)
English page - not availible yet
If you experience technical issues on the day of the examination, please call the support line on +47 776 20 880.
We would like to emphasize the importance of testing your connection before the meeting. For support during the testing process, please contact the Orakel service. This applies to all examiners. This information must be shared with all examiners well in advance of the examination.
A brief description of the process for examiners (the current practice may vary slightly between academic environments):
- Follow the meeting link and start the meeting.
- Admit the next candidate from the waiting room.
- Set a time for the candidate to call back to the meeting – make assessment with the second examiner.
- Readmit the candidate to the meeting on he scheduled time and notify him/her of the grade awarded.
1)
- Ensure you are well prepared
- Follow the Teams meeting link for the oral examination that you received from the student adviser.
- Log in to the meeting well before the examination is due to start.
2)
- Admit the candidate from the waiting room.
- The candidate then enters the meeting. The candidate must turn on his/her microphone and camera, which are mandatory requirements for taking the examination.
- If it has been determined that the student must identify himself/herself, he/she must show valid ID to take the examination. This should be shown to the examiner on the video before the examination starts. (Clarify with the academic community if this is a stipulated requirement)
3)
- When the examination has finished, set a time for the student to call back to the meeting.
- Conduct the assessment.
4)
- Readmit the candidate to the meeting from the waiting room on the scheduled time for the grade awarding.
- Notify the candidate of the grade/give an explanation.
- Remove the candidate from the meeting
- Terminate the meeting for the candidate.
When you have finished the examinations for the day, it is important to end the digital meeting.
Guidelines if the student...
- Is not in the waiting room? – Notify the person with administrative responsibility who can follow up the matter.
- Does not have video or sound? – Assess whether a new time can be allocated for the examination. Video and sound are both required to hold the examination.
- Does not have valid ID? – Ask the candidate to get ID. Additional time is not normally given. Follow the local guidelines stipulated by the academic environment.
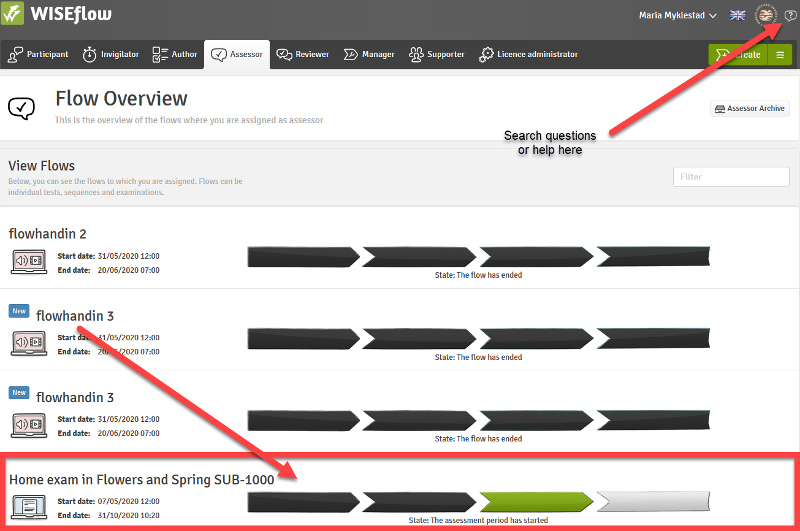
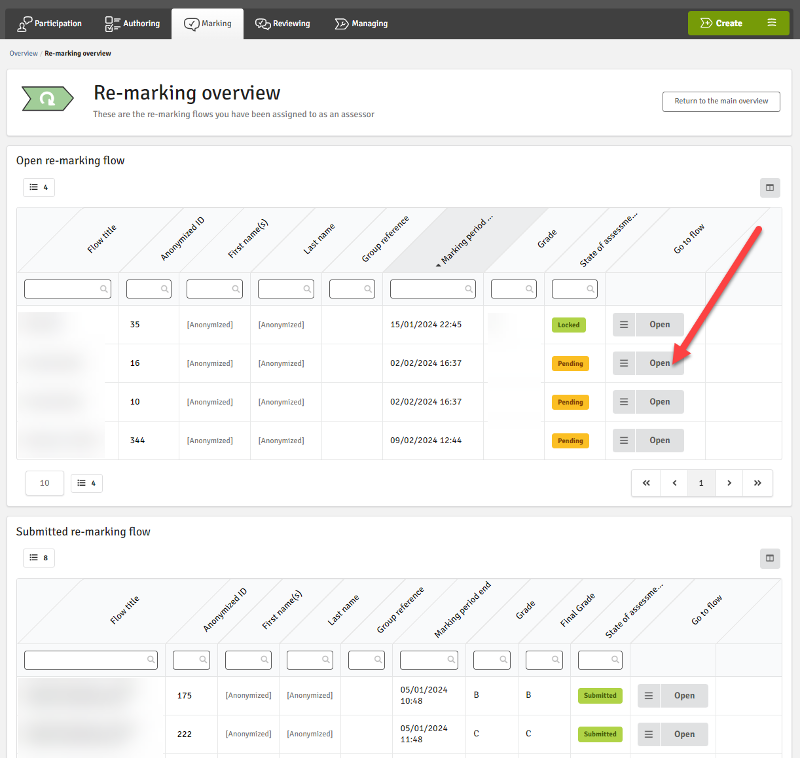
Log in as usual and make sure that the Marking-tab is selected. Select "Re-marking":

Appeals that are not yet re-marked are visible in the top section. Appeals that are re-marked and finished from both markers, are found in the bottom.
The re-marking overview page shows all appeals assigned to you. If you have assignments across several courses, they will all be visible here.
When "Open" is selected, the flow overview page for the specific course is shown, and you will again have to choose which candidate you wish to mark. The marking tool is the same as for ordinary exams, but with one important distinction: You cannot share comments or a justification with the appealing student. Justification or feedback must be shared outside of WISEflow.
The examination question paper can be a bit tricky to find, please se the screenshots beneath. Please see for Marking in WISEflow for general guidance.

From within the marking tool:

Key points from the regulations pertaining to examinations at UiT The Arctic University of Norway:
- For re-assessments in the event of an appeal about a grade awarded, two examiners shall be utilised, at least one of whom must be external.
- The new examination commission shall not receive information about the grade, explanations about the grade or the basis of the student’s appeal.
- The new examination commission shall always receive the assessment guidelines.
- If a part of an examination has a stipulated weighting, the student may appeal the grade awarded for that part of the examination, and the reassessment only concerns the relevant part of the examination.
- If a part of an examination does not have a stipulated weighting, all parts of the examination must be reassessed, and the final grade must be awarded based on the criteria specified in the course description and the assessment guidelines.
Remuneration of examiners used for reassessments
- Departments and faculties at UiT remunerate their examiners based on different models.
- If you have any questions about remuneration, please contact the administration at the faculty or department responsible for this examination. You will find the administration attached to this examination in the right-hand margin of the examination in WISEflow.
To receive support in connection with assessment, please contact the Joint Examination Service at UiT at eksamen@uit.no
Feel free to use the same e-mail address if you have questions about the planning and formation of the examination question paper. Internal users can also contact us via TOPdesk
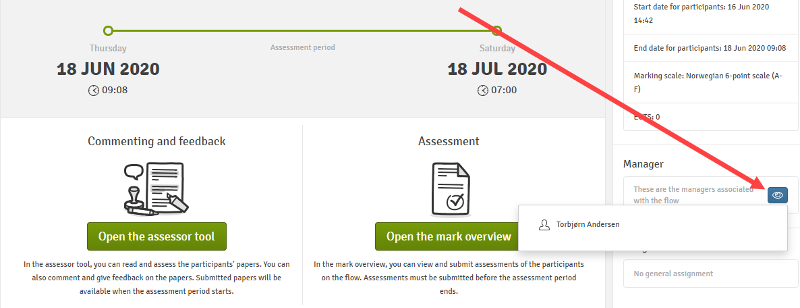
In Wiseflow it is possible to search for the people who are associated with the examination as administrators. They will have a personal profile page on UiT’s website. You will find a list of these on the flow here:
The Assessor tool in Wiseflow is designed to assess answer papers on your screen and online. However, if you need to print the answer papers or download them onto your computer, you can follow these step-by-step instructions:
- Click on the “Assessor” tab at the top of the screen and click on the relevant flow.
- Click on Download all files here:
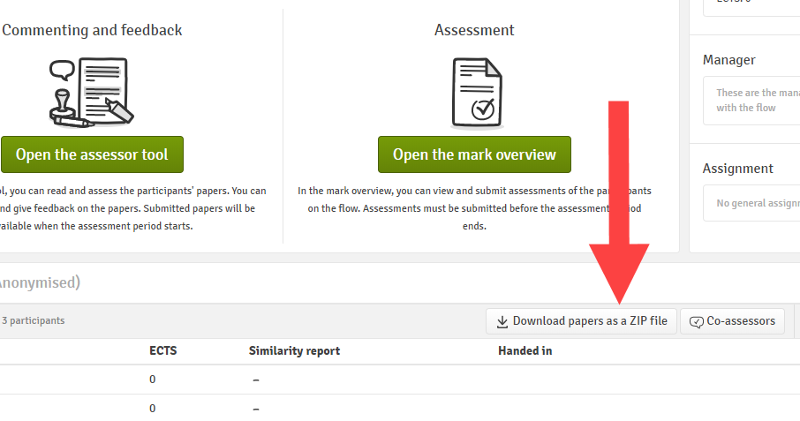
- Choose “All files in one folder” and then choose how you want to receive the cover page information. The information on the cover page includes the candidate number or name (if the examination is not anonymized).
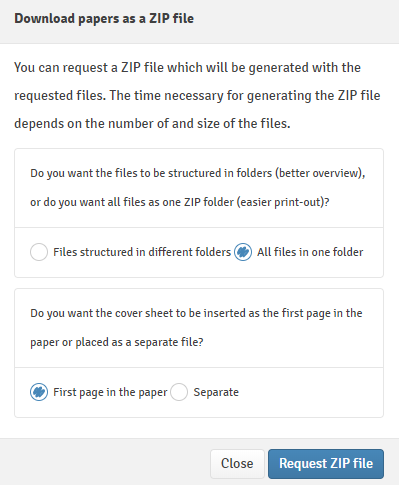
- It takes some time to generate the ZIP file. You will have time to make a cup of coffee while you are waiting. To download the ZIP file, click on Download papers as a ZIP file and Request ZIP.
- Choose where you want to save the files and then save. Find the folder in File explorer, right click on the folder and the click Extract All.
- If you only have PDF files, you can select (use the cursor and the shift or ctrl key) up to 15 files, right click and select Print. If you have more than 15 files, you can repeat the process or go to the next point. If you have a file format other than PDF, you also need to go to the next point.
- Open the printer queue for the printer you wish to use (Start – Devices – Printers & Scanners – Click on the printer and Open queue).
- While the window for the printer queue is open, open the folder in which the answer papers are saved. Select all the files (use the cursor and the shift or ctrl key) and drag them over to the window for the printer queue. The files will then be sent to the printer to be printed.
Alternatively, you can open each file and print them individually.